Step-by-step instructions to assemble HEST data
I. Visium reader
This tutorial will guide you to convert a legacy Visium sample into a HEST-compatible object.
Download Visium sample from NCBI
%%bash
# As an example, download the files from the following NCBI study:
# https://www.ncbi.nlm.nih.gov/geo/query/acc.cgi?acc=GSM6215674)

mkdir downloads
cd downloads
wget https://ftp.ncbi.nlm.nih.gov/geo/samples/GSM6215nnn/GSM6215674/suppl/GSM6215674%5FS13.png.gz
gunzip GSM6215674_S13.png.gz
wget https://ftp.ncbi.nlm.nih.gov/geo/samples/GSM6215nnn/GSM6215674/suppl/GSM6215674%5FS13%5Ffiltered%5Ffeature%5Fbc%5Fmatrix.h5
Create HESTData object from the image and count matrix
The library performs:
Creation of AnnData object
Creation of OpenSlide object
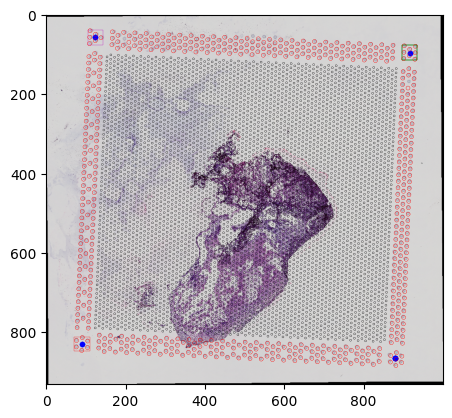
Automatic fiducial detection for spot alignment
Troubleshooting:
If you encounter: SystemError: ffi_prep_closure(): bad user_data (it seems that the version of the libffi library. Attempt: pip install --force-reinstall --no-binary :all: cffi
from hest import VisiumReader

fullres_img_path = 'downloads/GSM6215674_S13.png'
bc_matrix_path = 'downloads/GSM6215674_S13_filtered_feature_bc_matrix.h5'

st = VisiumReader().read(
    fullres_img_path, # path to a full res image
    bc_matrix_path, # path to filtered_feature_bc_matrix.h5
    save_autoalign=True # pass this argument to visualize the fiducial autodetection
)
alignment file is  None
AnnData object with n_obs × n_vars = 1182 × 32298
    var: 'gene_ids', 'feature_types', 'genome'
/home/guillaumejaume/anaconda3/envs/hest/lib/python3.11/site-packages/anndata/_core/anndata.py:1825: UserWarning: Variable names are not unique. To make them unique, call `.var_names_make_unique`.
  utils.warn_names_duplicates("var")
/home/guillaumejaume/anaconda3/envs/hest/lib/python3.11/site-packages/anndata/_core/anndata.py:1825: UserWarning: Variable names are not unique. To make them unique, call `.var_names_make_unique`.
  utils.warn_names_duplicates("var")
trim the barcodes
no tissue_positions_list.csv/tissue_positions.csv or alignment file found
attempt fiducial auto alignment...

0: 608x640 1 filled_hexagon, 1 open_hexagon, 1 hourglass, 2 triangles, 10.6ms
Speed: 1.7ms preprocess, 10.6ms inference, 7.9ms postprocess per image at shape (1, 3, 608, 640)
/home/guillaumejaume/Documents/project_rosai/HEST/src/hest/autoalign.py:111: UserWarning: You passed both c and facecolor/facecolors for the markers. c has precedence over facecolor/facecolors. This behavior may change in the future.
  ax.scatter(x, y, c='b', s=15, facecolors='none', linewidth=0.2)
/home/guillaumejaume/Documents/project_rosai/HEST/src/hest/autoalign.py:126: UserWarning: Setting the 'color' property will override the edgecolor or facecolor properties.
  circles2 = [plt.Circle(aligned_fiducials[i] * factor, radius=s_fid, color='r', facecolor='none', linewidth=0.3) for i in range(len(aligned_fiducials))]
st.save(path='processed')
saving to pyramidal tiff... can be slow
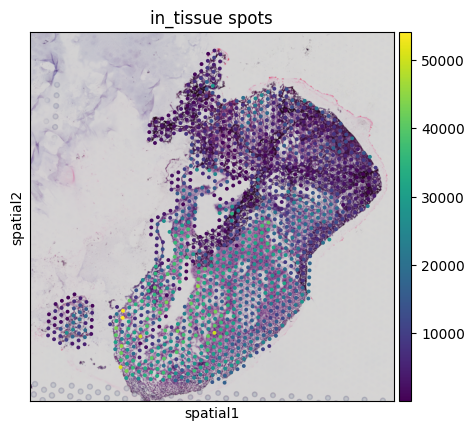
You can also visualize an overlay of the aligned spots on the downscaled WSI
st.save_spatial_plot(save_path='processed')
/home/guillaumejaume/Documents/project_rosai/HEST/src/hest/HESTData.py:1583: FutureWarning: Use `squidpy.pl.spatial_scatter` instead.
  fig = sc.pl.spatial(adata, show=False, img_key="downscaled_fullres", color=[key], title=f"in_tissue spots", return_fig=True, **pl_kwargs)
When should I provide an alignment file and when should I use autoalignment?
Step 1: check if a tissue_positions.csv/tissue_position_list.csv already provides a correct alignment
In most cases, if a spatial/ folder containing a tissue_positions.csv or tissue_position_list.csv is available you don’t need any autoalignment/alignment file.
Try the following:
st = VisiumReader().read(fullres_img_path, bc_matric_path, spatial_coord_path=spatial_path), where spatial_path is contains tissue_positions.csv or tissue_position_list.csv. You can manually inspect the alignment by saving a visualization plot that takes the full resolution image, downscale it and overlays it with the spots (using st.save_spatial_plot(save_dir)). If the alignment is incorrect, try step 2.
Step 2: check if a .json alignment file is provided
If a .json alignment file is available, try: VisiumReader().read(fullres_img_path, bc_matric_path, spatial_coord_path=spatial_path, alignment_file_path=align_path). You can also omit the spatial_coord_path as VisiumReader().read(fullres_img_path, bc_matric_path, alignment_file_path=align_path)
Step 3: attempt auto-alignment
If at least 3 corner fiducials are not cropped out and are reasonably visible, you can attempt an autoalignment with VisiumReader().read(fullres_img_path, bc_matric_path. (if no spatial folder and no alignment_file_path is provided, it will attempt autoalignment by default, you can also force auto-alignment by passing autoalign='always').
Examples:
from hest import VisiumReader

fullres_img_path = 'my_path/image.tif'
bc_matrix_path = 'my_path/filtered_bc_matrix.h5'
spatial_coord_path = 'my_path/spatial'
alignment_file_path = 'my_path/alignment.txt'

st = VisiumReader().read(
    fullres_img_path, # path to a full res image
    bc_matrix_path, # path to filtered_feature_bc_matrix.h5
    spatial_coord_path=spatial_coord_path # path to a space ranger spatial/ folder containing either a tissue_positions.csv or tissue_position_list.csv
)

# if no spatial folder is provided, but you have an alignment file
st = VisiumReader().read(
    fullres_img_path, # path to a full res image
    bc_matrix_path, # path to filtered_feature_bc_matrix.h5
    alignment_file_path=alignment_file_path # path to a .json alignment file
)

# if both the alignment file and the spatial folder are missing, attempt auto-alignment
st = VisiumReader().read(
    fullres_img_path, # path to a full res image
    bc_matrix_path, # path to filtered_feature_bc_matrix.h5
)
alignment file is None
---------------------------------------------------------------------------
FileNotFoundError                         Traceback (most recent call last)
Cell In[4], line 8
      5 spatial_coord_path = 'my_path/spatial'
      6 alignment_file_path = 'my_path/alignment.txt'
----> 8 st = VisiumReader().read(
      9     fullres_img_path, # path to a full res image
     10     bc_matrix_path, # path to filtered_feature_bc_matrix.h5
     11     spatial_coord_path=spatial_coord_path # path to a space ranger spatial/ folder containing either a tissue_positions.csv or tissue_position_list.csv
     12 )
     14 # if no spatial folder is provided, but you have an alignment file
     15 st = VisiumReader().read(
     16     fullres_img_path, # path to a full res image
     17     bc_matrix_path, # path to filtered_feature_bc_matrix.h5
     18     alignment_file_path=alignment_file_path # path to a .json alignment file
     19 )

File ~/Documents/project_rosai/HEST/src/hest/readers.py:374, in VisiumReader.read(self, img_path, filtered_bc_matrix_path, raw_bc_matrix_path, spatial_coord_path, alignment_file_path, mex_path, scanpy_h5_path, metric_file_path, custom_adata, autoalign, save_autoalign)
    371 check_arg(autoalign, 'autoalign', ['always', 'never', 'auto'])
    373 if filtered_bc_matrix_path is not None:
--> 374     adata = sc.read_10x_h5(filtered_bc_matrix_path)
    375 elif raw_bc_matrix_path is not None:
    376     adata = sc.read_10x_h5(raw_bc_matrix_path)

    [... skipping hidden 1 frame]

File ~/anaconda3/envs/hest/lib/python3.11/site-packages/scanpy/readwrite.py:221, in read_10x_h5(filename, genome, gex_only, backup_url)
    219 if not is_present:
    220     logg.debug(f"... did not find original file {path}")
--> 221 with h5py.File(str(path), "r") as f:
    222     v3 = "/matrix" in f
    223 if v3:

File ~/anaconda3/envs/hest/lib/python3.11/site-packages/h5py/_hl/files.py:566, in File.__init__(self, name, mode, driver, libver, userblock_size, swmr, rdcc_nslots, rdcc_nbytes, rdcc_w0, track_order, fs_strategy, fs_persist, fs_threshold, fs_page_size, page_buf_size, min_meta_keep, min_raw_keep, locking, alignment_threshold, alignment_interval, meta_block_size, track_times, **kwds)
    557     fapl = make_fapl(driver, libver, rdcc_nslots, rdcc_nbytes, rdcc_w0,
    558                      locking, page_buf_size, min_meta_keep, min_raw_keep,
    559                      alignment_threshold=alignment_threshold,
    560                      alignment_interval=alignment_interval,
    561                      meta_block_size=meta_block_size,
    562                      **kwds)
    563     fcpl = make_fcpl(track_order=track_order, track_times=track_times,
    564                      fs_strategy=fs_strategy, fs_persist=fs_persist,
    565                      fs_threshold=fs_threshold, fs_page_size=fs_page_size)
--> 566     fid = make_fid(name, mode, userblock_size, fapl, fcpl, swmr=swmr)
    568 if isinstance(libver, tuple):
    569     self._libver = libver

File ~/anaconda3/envs/hest/lib/python3.11/site-packages/h5py/_hl/files.py:241, in make_fid(name, mode, userblock_size, fapl, fcpl, swmr)
    239     if swmr and swmr_support:
    240         flags |= h5f.ACC_SWMR_READ
--> 241     fid = h5f.open(name, flags, fapl=fapl)
    242 elif mode == 'r+':
    243     fid = h5f.open(name, h5f.ACC_RDWR, fapl=fapl)

File h5py/_objects.pyx:54, in h5py._objects.with_phil.wrapper()

File h5py/_objects.pyx:55, in h5py._objects.with_phil.wrapper()

File h5py/h5f.pyx:104, in h5py.h5f.open()

FileNotFoundError: [Errno 2] Unable to synchronously open file (unable to open file: name = 'my_path/filtered_bc_matrix.h5', errno = 2, error message = 'No such file or directory', flags = 0, o_flags = 0)
Auto read
Given that visium_dir contains a full resolution image and all the necessary Visium files such as the filtered_bc_matrix.h5 and the spatial folder, VisiumReader.auto_read(path) should be able to automatically read the sample. Prefer read for a more fine grain control.
from hest import VisiumReader

# Set this to a folder containing a full-res image, filtered matrix and spatial files.
visium_dir = "PATH_TO_VISIUM_DIR"

# attempt autoread
st = VisiumReader().auto_read(visium_dir)
II. Xenium reader
Download Xenium sample from 10x genomics website
Download the following xenium files and place them in the same directory
https://www.10xgenomics.com/datasets/human-skin-data-xenium-human-multi-tissue-and-cancer-panel-1-standard
%%bash

mkdir downloads
cd downloads
wget https://cf.10xgenomics.com/samples/xenium/1.9.0/Xenium_V1_hSkin_nondiseased_section_1_FFPE/Xenium_V1_hSkin_nondiseased_section_1_FFPE_outs.zip
unzip Xenium_V1_hSkin_nondiseased_section_1_FFPE_outs.zip -d Xenium_V1_hSkin_nondiseased_section_1_FFPE_outs
%%bash

cd downloads/Xenium_V1_hSkin_nondiseased_section_1_FFPE_outs
wget https://cf.10xgenomics.com/samples/xenium/1.9.0/Xenium_V1_hSkin_nondiseased_section_1_FFPE/Xenium_V1_hSkin_nondiseased_section_1_FFPE_he_image.ome.tif
wget https://cf.10xgenomics.com/samples/xenium/1.9.0/Xenium_V1_hSkin_nondiseased_section_1_FFPE/Xenium_V1_hSkin_nondiseased_section_1_FFPE_he_imagealignment.csv
from hest import XeniumReader

xenium_folder_path = 'downloads/Xenium_V1_hSkin_nondiseased_section_1_FFPE_outs'

st = XeniumReader().auto_read(xenium_folder_path)
Working with larger than RAM Xenium samples (Xenium 5k)
We support larger than RAM transcripts pooling powered by dask. Dask will automatically chunk the data such that it never has to hold the entire transcript dataframe in memory.
Dask will attempt to process one partition per thread. To avoid loading large partitions on systems having a low amount of RAM, we advise using a high number of partitions (>100), as well as a single worker and a low number of threads (<4 depending on RAM available).
Note: feel free to open the dask dashboard to visualize workers, partitions and resources (usually on http://localhost:8787)
from dask.distributed import LocalCluster, Client

cluster = LocalCluster(
    "127.0.0.1:8786",
    n_workers=1, # increase depending on RAM available
    memory_limit="20GB", # dask will kill the worker if this is exceeded
    threads_per_worker=1, # increase depending on RAM available
)
client = Client(cluster)
print('dashboard is available at: ', client.dashboard_link)

st = XeniumReader().auto_read(
    xenium_folder_path,
    use_dask=True,
    nb_partitions=100
)
st.save_spatial_plot('./')
st.segment_tissue()
We then compute patches centered around pseudo-visium transcript bins.
Warning: note that patches might be larger than transcript bins.
st.dump_patches('patches', target_patch_size=224, target_pixel_size=0.5)
st.save('save', save_img=False)
Adding new samples to HEST
This section explains how to format new samples for HuggingFace
I. Sample preparation
1. Download raw datasets in structured folders
Create the following folder structure:
my_data/
    xenium/
        dataset_name_1/
            subseries1/
                sample_1/
                    ...
                sample_2/
                    ...
                ...
        dataset_name_2/
            sample_1/
                ...
    visium-hd/
        ...
    visium/
        ...
Then, download corresponding files for xenium, visium, visium-hd… See reader examples above or refer to the doc for the list of required files.
2. Add metadata rows to CSV
Fill columns in the sample CSV, specifically: dataset_title, subseries should match with the folder structure.
II. Sample processing
1. Process raw samples
Set the path to your sample CSV in tutorials/scripts/1_process_raw_samples.py, also modify the memory_limit, we recommend setting dask memory limit to at least 20GB for Xenium 5k, eventhough 30GB is safer.
Process and save raw samples by launching python tutorials/scripts/1_process_raw_samples.py.
Processing Xenium 5k will take time, you can monitor progress on the dask dashboard (usually at localhost:8787 after launch).
2. Check Xenium DAPI/HE alignment and realign if necessary
By default, the Xenium platform uses a single affine transform for the whole WSI. For some samples, the resulting alignment might be unsatisfactory. In order to visualize the affine alignment, either:
open the resulting
.geojsonfiles (inprocessed/) in QuPath (might not work with QuPath >=0.6)
or
launch
tutorials/scripts/2_check_xenium_alignment.py.
3. Micro-align DAPI to HE with Valis
If the alignment from steps (1-2) is unsatisfactory, we highly recommend using Valis non-rigid micro-alignment for sub-cellular alignment precision. This is crucial for correctly mapping transcripts and cells to H&E.
a. Register DAPI to HE with Valis
We provide a modified Valis version for simplified pythonic use and improved precision, please check-out the original repository here.
Open 3a_microalign_xenium.py, in this example, we use morphology_focus_0000.ome.tif as the DAPI slide, feel free to use morphology_focus.ome.tif.
Monitor alignment quality at results/{sample_name}/{date}/overlaps/, check both _rigid_overlap.png and micro_reg.png.
b. Warp transcripts, cells and nuclei using Valis and Dask
See 3b_microalign_xenium.py to warp transcripts, nuclei and cells from DAPI to H&E.
Then re-run step 3.b, in order to compare quality.
4. Segment with CellViT
See 4_segment_cellvit.py to segment with CellViT.
5. Copy processed files to HEST_results/
See 5_copy_processed.py to copy files to the structure expected by huggingface.
6. Generate a new HEST_vX_Y_Z.csv sheet
See 6_generate_new_meta.py to create a new HEST_vX_Y_Z.csv. Once created, copy it to the HEST_results/ folder.
7. Upload to HuggingFace
See 7_upload_huggingface.py to upload to HuggingFace via a PR.